So one of my most memorable and favorite hunts happened Labor Day weekend of 2015. The reason why this hunt is twofold. First, I was hunting with Jonathan. Second, it was my first introduction to the 300 Blackout. You can read about that hunt here, Gorillas Chasing Hogs – The Holy Grail of Hog Hunting? I won’t go into the details, but it was a great hunt. After that outing, I told myself “One day I will have a 300 Blackout Pistol.” And that’s how this little adventure started.
300 Blackout Pistol Build Priorities
Well fast forward a couple of years and the little seed planted on that hunt needed to come to fruition. I really didn’t know what I wanted but I got this wild idea that it would be really cool to build a 300 Blackout pistol (even though I am the least qualified person to actually build a weapon).
I was fortunate because I could ask Jonathan a ton of questions, most of which he never answered. Instead, he would answer my question with a question and it sent me down the rabbit hole known as the internet where I looked through different forums, read different reviews and saw what Keyboard Commando Bob2418 out of Toledo said about the subject. Also, I’ve become great friends with Casey over at Essayons USA. He’s built several AR-15’s over the years and I was able to pick his brain quite a bit. Without these two men, this project would still be an unfinished idea.
Everything was a blank slate and I wasn’t officially part of SHWAT™ yet. Casey taught me about the different parts and components that were needed to build the pistol. With that in mind, I started to really research what I wanted out of this gun. Here were my requirements:
- It had to be reliable (which can be tricky when you’re building one instead of buying a completed one)
- It had to be accurate
- It had to be compact and lightweight
- It had to look cool

Since reliability and accuracy were the two big factors, I spent a lot of time researching different brands and parts. I know people can debate that a $75 lower is just as good as a $200 lower but I didn’t mind paying for the nicer component. I firmly believe that you get exactly what you pay for. Besides, see priority number four above.
At the same time, I didn’t want to break the bank because I like breathing and want to see my kids grow up. I didn’t want my wife to murder me. She really wouldn’t (she’s probably the nicest person you haven’t met), but I wanted to make sure that I didn’t go overboard on this project. I wasn’t in a rush to get this project done so I planned on buying parts when I could get good deals on them.
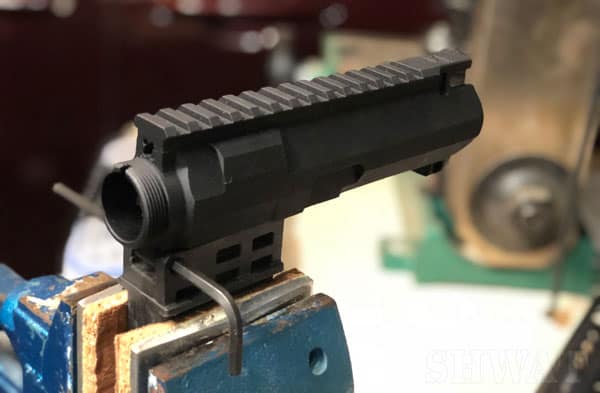
Seekins Precision SP223 GEN2 Billet Upper/Lower Combo
Now that I had my parts list and the cost and the weight of each item, it was time to start the build. The first two components I acquired were the Seekins Precision SP223 GEN2 Billet Upper/Lower Combo. Why Seekins? I knew it was a good and reputable brand, but what really happened was we had a couple of sales contests at work and the winners received points. These points could be redeemed for various things including Cabela’s Gift Cards. Guess who had this upper and lower in stock at a store near me? I never would have guessed that Cabela’s would have this in stock, but they have a lot of tactical gear and are starting to carry more.
Throughout the project, I was a lot like Andy Dufresne in The Shawshank Redemption, but instead of going into the prison yard and dropping pieces of rubble that would lead to his escape, I was surreptitiously stockpiling boxes of gun parts in the top of my closet that would become my custom 300 Blackout AR Pistol. I would buy a charging handle here, a BCG there, and just like Andy digging his escape to freedom, this project also took some time. I ordered the upper and lower in March of 2017 and didn’t complete the pistol until June of 2018. I took my time researching the parts that I wanted, here are my thoughts on a couple of them.
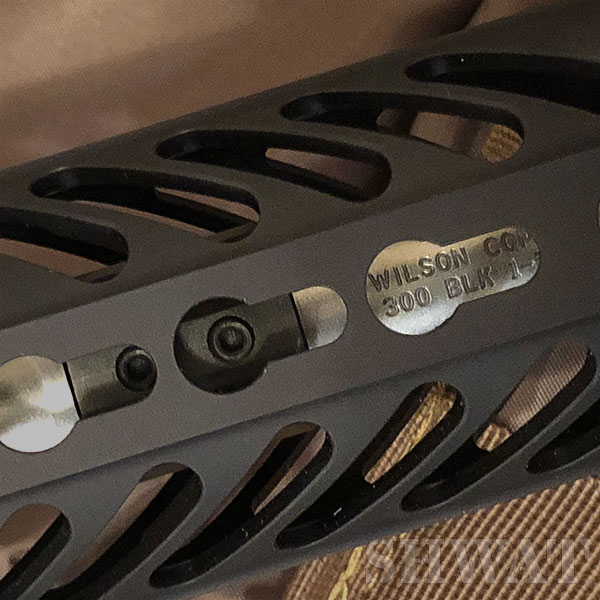
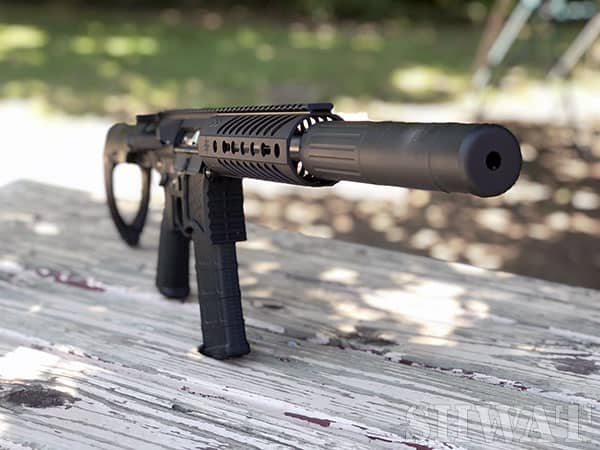
Wilson Combat 8” Match Grade Barrel
It’s common knowledge that Wilson Combat has great barrels. The 8″ Match Grade 300 BLK barrel checks numbers 2, 3 and 4 off my requirements. Wilson Combat is known for making some of the most accurate barrels on the market (Here’s a quick 75 second video on how they make these barrels). As for being lightweight (it only weighs 17 ounces!!!), I debated for months how short I wanted to. I wanted the barrel to be short but have enough energy to put down hogs. From everything I read, this barrel should have a little less energy than a 16” 223 barrel. I was okay with losing the little bit of energy and force for the trade-off. Plus, I think a shorter barrel looks really cool. The barrel has a 1:7 twist ratio which allows for heavier subsonic ammo. At the distances I usually shoot, this will be perfect.
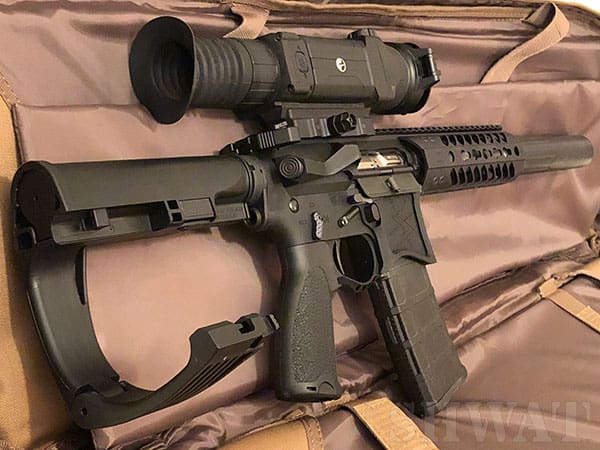
Gear Head Works Tailhook Mod 2
The Tailhook Mod 2 definitely checks off the box for #4 as well as #3. This pistol brace weighs only 6.7 ounces (not including the buffer tube) and has 5 different positions to select from which really allows me to adjust the brace to the best fit for me. There is also a web sling loop that is a huge plus because with as much walking as we typically do on a hunt, I want to make sure I can easily throw a sling on this rig. For a solid look at the concept and video, check out Jonathan’s story from when the original Gear Head Works Tailhook Pistol Brace was announced.
JP Silent Captured Spring H2 Version GEN 2
One of the things I learned about this JP beauty, no buffer retainer required! While this doesn’t necessarily fall into one of the 4 categories, I was excited that I put this in the pistol. When hunting in the darkness of night, I like to be quiet as possible and the last thing I want when I chamber a round is for the buffer spring to screech like you are setting up grandma’s old ironing board. This heavier spring is comprised of 1 steel and 2 tungsten “weights” versus 2 steel and 1 tungsten that are found on the standard capture spring.
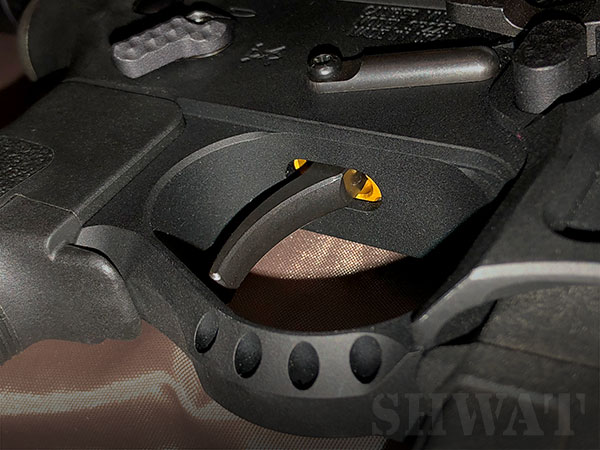
Timney Trigger AR-15 Competition Trigger, 3 lb
This definitely falls into #2. I’ve always been told that if you do anything to a rifle/pistol, get a better trigger. For whatever reason, I’ve never taken that advice but since I was building this from the ground up, I wanted to have a great trigger. Jonathan ALWAYS talks about Timney triggers and so I felt it was an obvious choice. While sitting in the living room, I’ve dry fired this pistol quite a bit and the upgraded trigger is immediately noticeable when comparing to my first AR. At just 3 pounds, I feel like I just need to breath on the trigger to send a round downrange. It was pretty easy to install, Jonathan did a video installation showing how to install the Timney Trigger.
Other 300 Blackout Pistol Build Parts
Here are the rest of the parts in no particular order:
Lantac Pistol Length Gas Tube
Seekins Precision Safety Selector Kit
Seekins Adjustable Gas Block
Seekins Precision SP223 Gen 2 upper/lower
Seekins Precision MCSR V2 Keymod RAIL 7″
Lantac Enhanced BCG
Radian Weapons Raptor-SD Ambidextrous Charging Handle
Advanced Armament Corp 51T Flash Hider
Advanced Armament Corp SDN-6
Bravo Company USA BCM Gunfighter Grip Mod 0
KNS Precision Gen 2 Anti-Walk Pins
CMMG Lower Parts Kit
My AR Pistol Build Process
Once I had all of the parts, I coordinated a time with Casey and Justin (also with Essayons USA and a real-live American hero), to help me put the pistol together. Justin’s garage was like an armory and he had every tool imaginable – and some that I probably couldn’t have imagined – to put this pistol together. I was really thankful because I didn’t have any clue on all the specialized tools that would be needed to get this done. I would probably still be in Justin’s garage if they weren’t there to babysit me on this adventure.
Since this was not Casey and Justin’s first rodeo, they told me what I needed to do and would step in when I ran into challenges. It was pretty neat to put the pistol together. It reminded me of when I was younger and I would get a new Lego set. I had all the different parts laid out and instead of following the instructions from the little booklet, I had a two men guiding me through the process.
We started with the upper and it went relatively smoothly. I will say that my fat little fingers aren’t great for putting some of the smaller pins and springs in their places and this was where the pros stepped in. One of the tools that Justin had that really made a difference was the gas tube alignment tool. I don’t know if it is a necessity, but it was a huge help. The only hiccup that we ran into on the upper was that I left the screws for the Seekins Precision rail at home.
While I felt the lower had more smaller (and moving) parts, it seemed like we put the lower together a lot faster than the upper. By putting this weapon together, it gave me a lot better understanding of how and why it works and if it doesn’t work, where to start looking for the problem. Maybe it’s just me, but I felt a lot of pride when I bought my first AR, and putting one together gave me a lot better feeling. As much as I love my first AR, It might start feeling a little neglected. If you haven’t built your own AR, I highly recommend it. And if you were at farm with me, feet kicked up basking in the glow of a great hunt I’d probably mention that I think l God has instilled in men the desire to build and construct things. Maybe that’s part of my sense of satisfaction here. By building your own weapon, you will learn a ton about it but perhaps more about yourself.
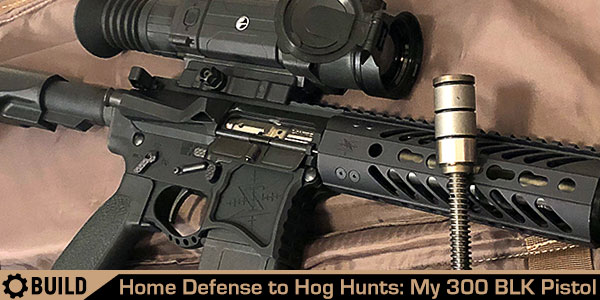
The only thing left to do is get my Pulsar Trail XP50 on it, get it sighted in and get it out to the farm. The hogs don’t have any idea what’s in store for them. I can’t say for certain but I imagine that there will be a follow up story.

that’s real patience!
Pablo,
You are right. I wasn’t in a huge rush so it was nice to be able to build it at my pace and with the parts that I wanted. Thanks for the comment