 The concept of long range deer hunting in the mid-west is a matter of perception. Most of us grew up hunting with a shotgun and the effective kill range was well within 100 yards. Now imagine stretching the kill range to 600 yards or more? What!? This range is nothing new to our neighbors to the west in more mountainous terrain, where long distance shots are common. Hunting at these distances is shocking to many in the flat terrain of the Midwest, where corn and soy bean fields stretch for miles with farm houses and barns peppering the landscape. As you would imagine, local farmers and many traditional hunters shook their heads in 2016 when the Indiana Department of Natural Resources (DNR) allowed high power rifles on private land for deer firearm season. There are some limitations to which cartridges can be used, but some Hoosiers interpreted this DNR decision as lunacy. Not here! This was an amazing opportunity to test my long range hunting skills with my Remington 700 SHWAT™ project.
Coincidentally, my first deer harvest was a ten point buck in northern Indiana and at the time I was using a $250.00 pawn shop special Winchester 1400. Back then, shotguns were the go to rifle for deer season. It was nothing fancy, but it got the job done at a whopping 25 yards. I still remember that day and I think my dad was more excited than I was. Success was done on the cheap, but who’s counting dollars? Everybody! Do you calculate your total hunting cost/lb of venison every season? I’d imagine your number is probably as high as mine. In the end, the memories made justify the premium invested.
The Challenge
But just for fun let’s look at this in a different way, considering only kill shot distance in the equation. How is that? For example, if you do the math with the cost of my Winchester 1400, that kill shot cost me $10/Yard. Do you follow me? This could be fun. In fact, the further the kill shot, the cheaper it is per yard. Agreed? How would this apply to a long range hunting rifle? Let’s go through the steps of my Remington 700 build and see if I can progressively make it cheaper with every kill shot.
Initial Build Investment
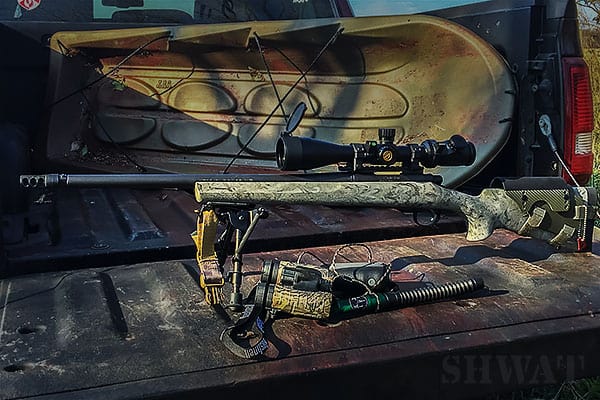
The Rifle
 Other than skill, the major obstacle to long range hunting is the initial investment. Mind you, in the US Optics course I took in late 2015, I was using a loaner Desert Tech .300 Winchester Magnum Sniper Rifle and a borrowed US Optics LR17 optic. This setup alone would cost me over $7,000 to replicate, which is nowhere near my budget. Moreover, if my wife found out… Can you imagine your wife finding the receipt? Yes, the horror…The horror! Keeping this in mind, for a majority of us, including you, the reader, I took a more value-based approach to this project.
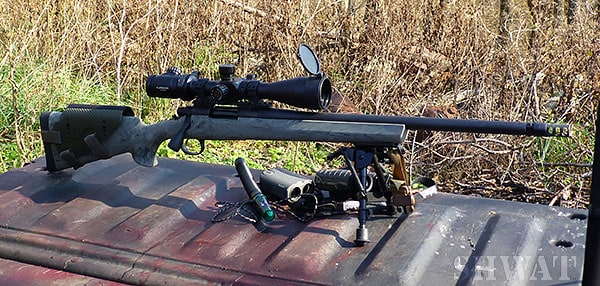
First and foremost, I needed to decide which rifle to go with. I reached out to several of my firearm instructors and explained that I was working on a value based long distance rifle build. The feedback was unanimous, the Remington 700 SPS Tactical AAC-SD was the clear winner. As for caliber, the feedback I received was as expected; the 6.5 Creedmoor was the caliber of choice. Don’t get me wrong, the ballistics are amazing, but what‘s the chance of finding 6.5 Creedmoor ammunition in a small country town gun shop? It’s not a gamble I wish to take. After some thought, I decided to go with the .308/7.62×51 NATO cartridge. The .308 can be found almost anywhere in the US and there are plenty of brands and grain choices to choose from. Furthermore, given I’ll be hunting on private farms in Indiana, realistically, I won’t be shooting past 600 yards, which is pretty much the kill range limit for this caliber.
The Remington 700 SPS Tactical AAC-SD features a 20” heavy threaded barrel. The heavy barrel mitigates heat related accuracy issues and the threaded barrel allows the use of muzzle brakes, flash hiders and suppressors. The rifle also features the Remington X-Mark Pro externally adjustable trigger. It’s a single stage trigger with a factory pull weight setting of 3 ½ pounds. It can be adjusted easily from 3 to 5 lbs. It’s a clean break with no creep which has worked flawlessly in the field. I prefer two stage triggers for my long range hunting rifles, so I’ll be on the lookout for a Timney Trigger upgrade sometime in the near future.
The Optic
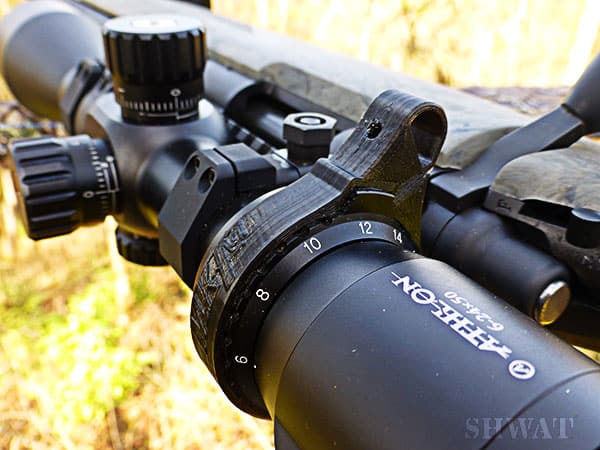 A good optic and quality rings are a must. I was fortunate to be introduced to Athlon Optics by a fellow shooter. After visiting with the their sales and marketing team I decided on the Argos BTR 6-24×50 MIL FFP Scope. The features of the Argos are a perfect complement to the value based build and the .308’s ballistics. Athlon Optics did a great job in delivering high end features to a high value scope. The Argos 30mm scope is argon purged and constructed with 6061T6 aircraft grade aluminum. The optic features advanced proprietary multi coated lenses, delivering crystal clear images in darker environments. A must for hunters! The Argos exclusive XPL coating protects the lenses from the harshest weather and terrain. There’s more! The MIL reticle is etched in the glass and the illuminated reticle feature is fantastic for low light conditions. The exposed turrets adjust by .1MIL with every click and offer 5MIL per rotation with a total 18MIL elevation and 18MIL windage adjustment. The Argos does not feature a zero stop, but the addition of a washer to the elevation turret will do the trick. The scope also features a side parallax adjustment for quick a clear target focus from 10 yards to infinity. I’m really impressed with all the features packed into this optic.
 The Mount
The Argos scope sits on a Badger Ordnance Remington 20 MOA bias short action scope rail with an integrated recoil lug and held by Badger’s 30mm machined pair rings. The 20 MOA bias and true MIL STD 1913 slot pattern provides additional MIL elevation for longer range shots and flexibility for additional mounting options. For the money, it’s tough to beat Badger quality and precision. The 30mm rings are truly unique as both rings are cut from the same block of ordinance grade steel and share the same serial number. That’s so cool! The black oxide finish is great and lapping is not necessary, so installing the Argos was quick and easy. Can you imagine installing a scope in just minutes?
The Cheek Rest
 The Remington 700 SPS Tactical AAC-SD comes standard with a Hogue overmolded Ghillie Green pillar-bedded stock. It’s simple, weather resistant, but lacks the ability to adjust the cheek rest, which is vital for long range accuracy and consistency. I’d imagine some of you have seen the cut yoga mat/Duck Tape alterations at the range. Don’t get me wrong, it’s effective for some, but I found a better solution that doesn’t involve any cutting, sanding, power tools or any permanent manipulation of the stock. Let’s ask Bradley! Do you know him? Let me tell you about his adjustable olive drab carbon fiber cheek rest. It’s a brilliant, light weight, fully adjustable made in the USA cheek rest. As a one piece, it provides 3/8” cheek rise and it’s adjustable to a comb height of 1 ½”. The cheek rest is an easy install and it’s secured by non-skid material and Velcro straps. Esthetically, it’s a great looking design and Bradley has numerous colors and styles available for various platforms. In my opinion, Bradley’s Cheek Rest is a must have for all bolt gun shooters.
The Ammo
The .308/7.62×51 NATO cartridge is a great choice for long range hunting because of the availability of numerous high end brands and grain combinations. One thing to keep in mind is that not every rifle barrel likes every bullet/grain combination. The SHWAT team approached Barnes Bullets and the team suggested I start with their 150g Tipped TSX (TTSX) BT Barnes Bullet.
For those of you who have not tried a Barnes Bullet TTSX BT for hunting, you’re in for a treat. Their bullets have an excellent reputation for one shot clean kills. In this specific case, the TTSX solid copper bullet design strikes the game and as the bullet begins to open the cavity fully expands, delivering extra shock with maximum kinetic energy. The polymer tip assists with a faster expansion rate and better long range ballistics. It’s ideal for medium size game. Take a look at the impressive numbers below.
The Barnes Tipped TSX (TTSX):
- Muzzle Velocity (MV) 2,900 ft/sec and 2,802 ft/lb Muzzle Energy (ME)
- 100y 2,680MV/2,392ME
- 200y 2,470MV/2,033ME
- 300y 2,270MV/1,717ME
- 400y 2,079MV/1,440ME
- 500y 1,898MV/1,200ME
- 600y 1,728MV/994ME (Maximum effective kill yardage)
As you can see from the ballistic data above, the 150g bullet is a great alternative, but this barrel wanted something heavier. Over the past few months I’ve shot heavier bullets to get a feel of what this barrel truly wants. The 168g bullet groups considerably better and I’ll soon try the 175g bullet. The variance in bullet grouping is all due to the science of physics, specifically the barrel’s harmonics. It’s an interesting topic and great bedtime material.
What do you think so far? The cost for this build will be outlined below, but I need to mention a few strongly suggested accessories to consider before hitting the field.
 Secondary Investment: The Extras
Support
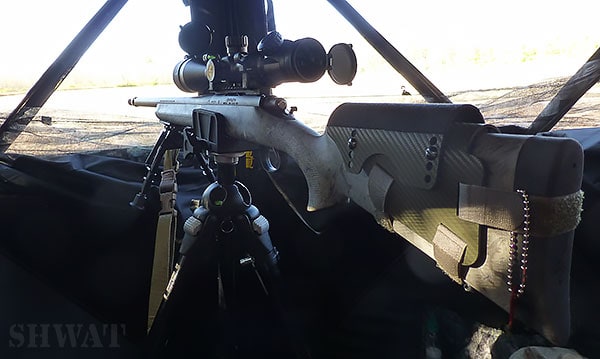
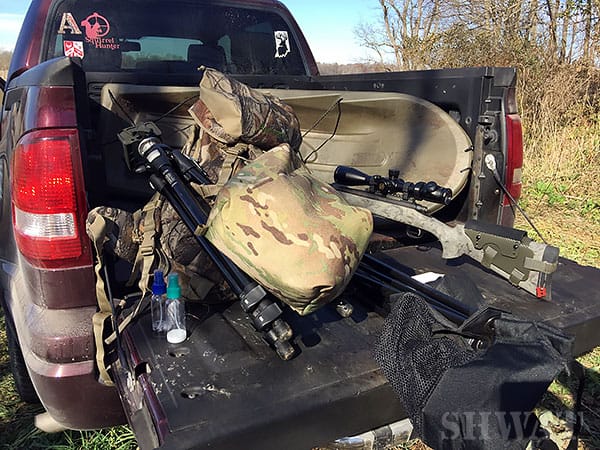
Rifles of this size and weight are clumsy in a tree climber or stand. From my experience, I’d suggest you stay on the ground. This type of hunting will probably be done out of a blind or behind natural cover. In either case, a good quality gun support attached to a sturdy tripod with a shooting bag will keep you on target no matter the distance.
Let me introduce you to Josh, an ex-Marine Scout Sniper and OIF Veteran. He designed the Hog Saddle, a rifle rest tailored for the military and law enforcement. It’s an amazing tool for hunters, too! Josh shared some of his stories from overseas. Crazy stuff! The Hog Saddle provides a rock solid foundation to maintain your rifle’s sights across long distances for that once in a lifetime shot. It maximizes the hunter’s ability to make the ethical one shot kill we all strive for. Josh recommends a sturdy tripod to mount the Hog Saddle. In my case I purchased a used Manfrotto 3021BPRO tripod which is the same model he used overseas. How cool is that!
Another accessory to consider is a shooting bag. No, not the one you would normally use on a bench, but you could. This bag is meant to assist the shooter/hunter to get into a comfortable shooting position. Shooting bags are very common in precision rifle shooting (PRS), but some hunters like myself use them to get into solid prone, standing and sitting positions. I reached out to Sarge’s Shooting Bags based in Indiana. Sarge served in the US Army for ten years with deployments in Iraq and Afghanistan. He, too, is an avid shooter and hunter and we had a great talk over different shooting positions and how his bag(s) would help with accuracy. The one bag I use in the blind is named “The MOAB”, a 10’x8’x7’ bag which comes standard with a carabiner loop and two speed traps along the top. This is one of Sarge’s most popular models and it’s available in multicam, OD Green or Coyote patterns. It fills in the space between my leg and buttstock when sitting in the blind. An addition to this equation is the Harris Bipod which is standard equipment to almost every shooter I’ve met. It’s a necessity in the prone, but also works well with barriers and as an anchor point for a two point sling for additional support. The combination of the Hog Saddle, tripod, bipod and MOAB provide the hunter a solid and comfortable shooting platform. Three one shot kills can attest to this. More on that later…
 What are your initial thoughts? I’d bet you though the price would be much higher. Trust me, it can get into the thousands just for the rifle itself with no optic or accessories. The optional accessories mentioned do add over $900 to the build. The Badger Bolt Knob is a considerable upgrade to the standard Remington knob especially when a quick follow up shot is necessary. Do I need to say more than “SilencerCo”? No, the name speaks for itself and their suppressors are well known in the industry for their quality and durability. The MK Machining bubble and throw lever are so inexpensive that their benefit towers over the extra $40 spent. Lastly, unless you want to be doing some range estimation math in the field, a quality range finder is strongly suggested. I’ve owned the Leupold 750 for years and it suits my immediate needs, but I’d recommend a range finder that’ll go out to 1,000+ yards.
The Cheaper Challenge Hunt
 So, I’d imagine you’re asking how this build gets cheaper. Let’s dive into that now with a flashback to my 2016 Indiana deer firearm season opener. I’ve provided you the prelude to the hunt. The training, research and range time has now come to the test. Prior to this opener, I’d only shot the Remington build out to 100 yards. I had no time to test my dope out to 600 yards, so I was basing my entire hunt on prior experience, ballistic tables and a little luck.
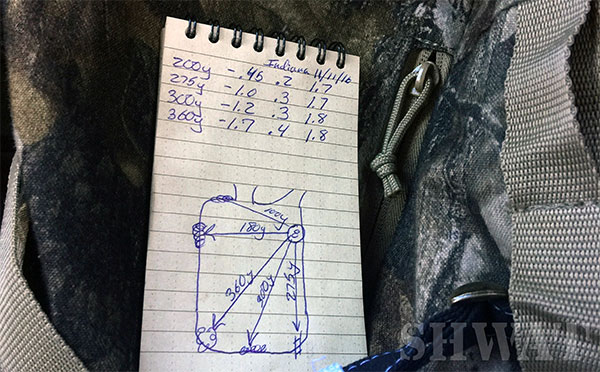
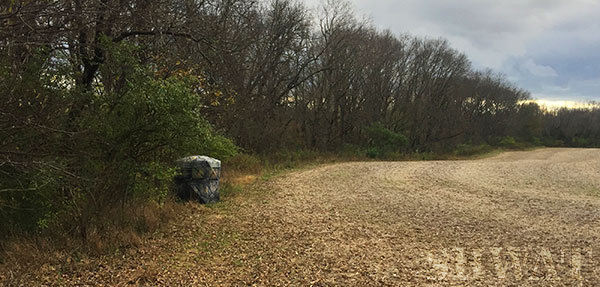
My father, Kelly and I arrived at John’s farm in Brownsville, Indiana around 4:00 PM Friday, the day before the opener. I’d just flown in from Miami, FL and the weather was cooperating so far. No crazy Indiana weather in the forecast this time. Prior to the hunt, I’d used Google Earth to plan my hunting blind location and approximate maximum shooting distance in every direction. Based on the location of my blind, my maximum yardage would be 325 yards at the end of the field and approximately 120 yards across the field. I was well within the maximum kill yardage of 600 yards and for the most part I was on the money with my preliminary research.
 Now it was just a matter of setting up quickly and not spooking any deer. John switched to soybeans this year, so I honestly didn’t know what to expect with deer activity. No chasing had been observed either, so we assumed pre-rut activity was still in place. The soy bean field I’d be hunting on would essentially be a transition zone from the bedding area to my south, the preserve to my east and the corn fields on the adjacent farms.
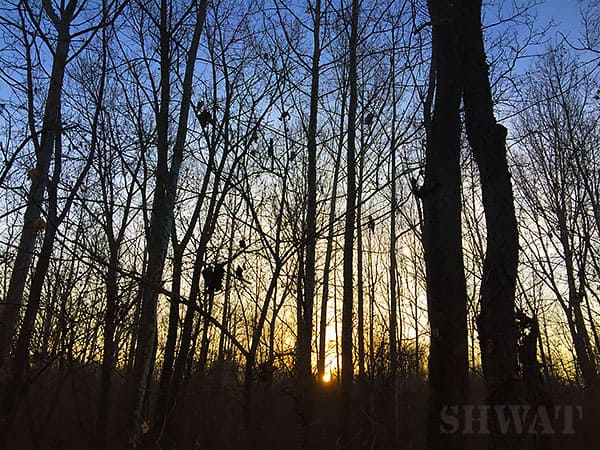
Opening morning was perfect! It was in the high 20s and a thin layer of frost covered my dad’s truck. The stars sparkled in the sky and the cold dry air embraced my face as I collected my gear in Kelly’s garage. I was excited and a yet little anxious. My experience with my Remington was very limited and much of it was theory. I did all my homework, but I lacked the experience of shooting out of a blind and everything was going to be new to me in just a few minutes. I was ready for the ride, white knuckles and all.
Upon arrival, I gathered my gear and it’s a bit heavier than usual this year. My headlamp guided the short walk down the gravel road toward the soybean field. All was quiet; the only sound I could hear was the crunch of the frost under my boots as a walked toward the blind. It too was covered with frost, glistening in the moon light. I took a brief look at the field and took in the moment to enjoy the beauty of America’s Heartland. It’s time to break the silence with gun fire.
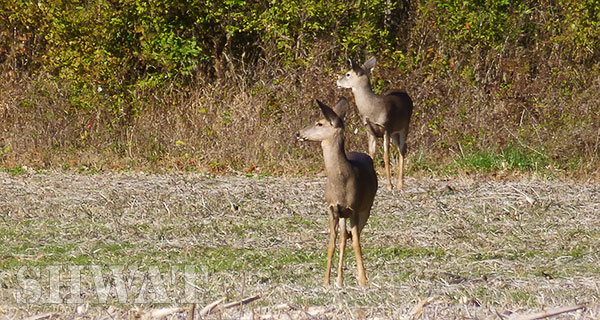
Sunrise was around 6:45 AM and it’s always a delight to hear the woods awaken. I was comfortably set up in my blind with all my tools within reach. Just after 11:00 AM a mature doe and yearling magically appeared 100 yards directly in front of my blind. Does this also happen to you? Is there a natural trap door or something? The doe was leading and she couldn’t see me in the blind because the blind’s dark interior blacked out my silhouette. I slowly moved my tripod to the right, adjusted my shooting bag on my lap and took my position behind the rifle. Here we go! She was getting too close and it was just a matter of time before she would see the deer sniper in the blind.
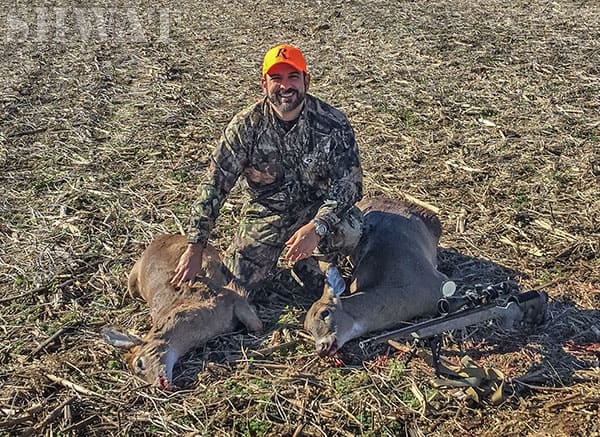
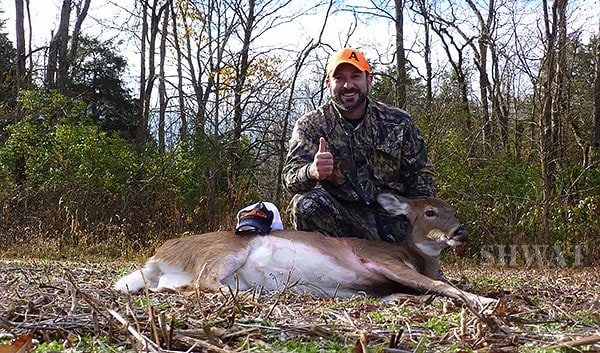
 My heart was pounding and I took a breath. No scope adjustment was needed and I lined up the cross hairs over her vitals. BOOM! The bullet passed clean through her lungs and she sprinted down and across the field on her last breath, falling 80 yards from where she stood. The yearling, a button buck, sprinted past her. He stopped 200 yards down the field not knowing what had just happened. I quickly chambered another round and sent it, dropping him where he stood. The bullet entered just in front of his right shoulder blowing out his lungs and spine. Meat for the freezer boys! The Remington build had officially shed first blood and I officially stretched my furthest deer kill from 50 yards to 200 yards. Brilliant! The first shot translated into a cost of $30.93/yard and the second shot decreased my cost to $15.46/yard. Wow, it’s amazing how this math works. Let’s see how much cheaper I can get!
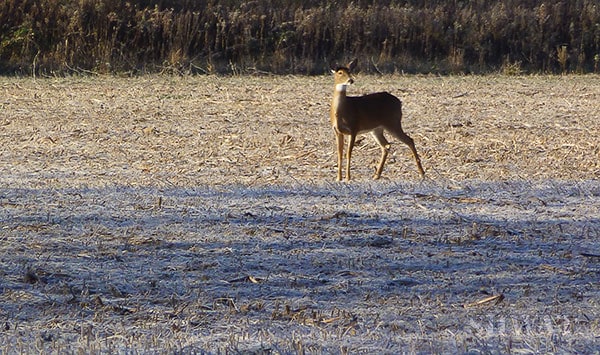
 The very next day at 9:30 AM a doe and yearling came out of the same spot as the previous day. Can you believe this? I was in no rush to fill up my tag so I shot them both with my camera. I bet the word “shot” got you thinking… No rifle shooting this time, I got some great pictures and it was wonderful to observe nature for a little while. Can you relate?
 It was Monday morning and as many of you have experienced, deer start to disappear. They get spooked and go nocturnal. There had been plenty of shooting going on around me the last couple days and it was unclear if the pre-rut was still in place or if we’ll see some chasing today. Either way, I patiently sat in my blind waiting for an opportunity to go cheaper. Just after 9AM two deer appeared at the very end of the field, roughly 320 yards away. It was a good size doe and a yearling. I carefully moved my chair behind the tripod and set myself up for the shot.
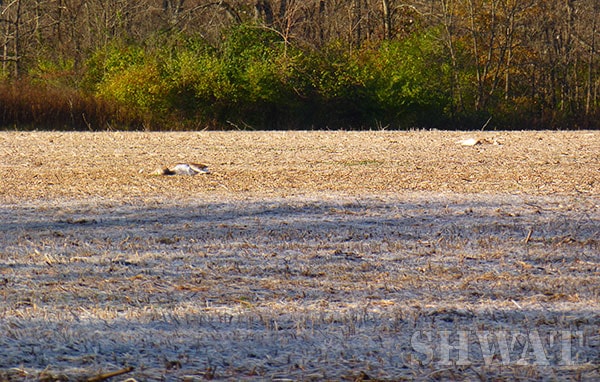
The doe was walking along the edge at a slow pace, so I had some time. By the time I was set up she was at 300 yards. I quickly adjusted my Argos’ elevation turret for a 300 yard shot, held the tripod with my weak hand as I set myself behind the rifle. The setup was perfect and my position was steady for the longest shot I’ve ever attempted on any game animal. In under a quarter of a second, the Barnes 150g TTSX solid copper bullet found its target just above the heart. She didn’t even hear the shot before impact. The doe sprinted 20 yards and collapsed. The other doe ran a short distance, but stayed in the area. She approached the deceased doe and then went on her way like nothing had happened. I’d never observed this behavior before.
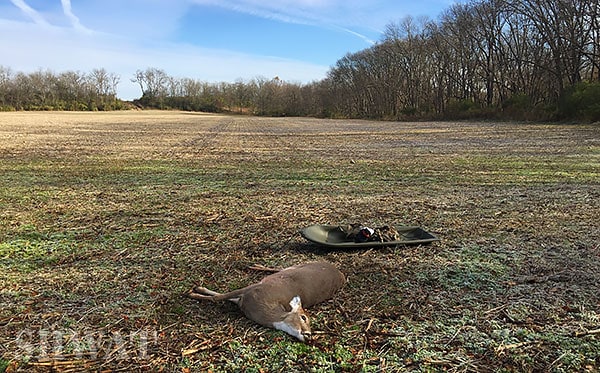 I got some great pictures of her and she’ll live another day. In the end, November 14, 2016 goes down in history as my longest kill shot of 300 yards, decreasing my cost/yard to $10.31. I love this math! LOL! I have every intention of making this rifle even cheaper in 2017.
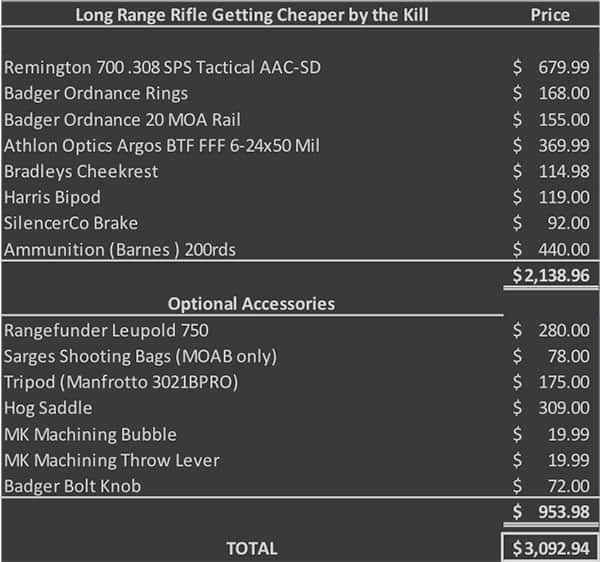
In retrospect, I should have embraced long range shooting and hunting years ago. I had every intention, but to be honest, I feared the initial cost and really didn’t think I could afford it. As you can see from the build’s basic cost of $2,100 and overall cost of $3,100, a high value build is realistic for most of us. Fortunately, with a little research, high value products and accessories like the ones I noted above can be found. Before you know it, you’ll be banging steel at 600+ yards and harvesting game way beyond your current comfort zone. Why not you? Why not now?
In the end, did you enjoy the way my one shot deer kills got cheaper by the yard? It’s simply a fun way to challenge oneself to send it further and enjoy the satisfaction of long range ethical kills. I’d imagine it would be a fun challenge amongst everyone at deer camp. You think? I have every intention to make my rifle build considerable cheaper this coming deer season. I’ve successfully shot steel out to 1,000 yards and I feel very confident in maxing out the .308’s kill yardage of 600 yards. I love the SHWAT™ Life!

Man what an outstanding post! As you stated when one thinks on Long Range shooting, the budget goes to $6K-$7K. Here we can tackle one piece at a time. Love the fact that you are not just throwing out information, but also a real life application of it. Keep it up. Can’t wait for one with the AK-47 as a hunting rifle.
Hi Oswaldo,
Thx for the feedback. My friends at Kalashnikov USA may assist me with your request some time in the future.
E
Great Article Erik, well laid out with the parameters and what a person needs to set up for a successful hunt affordably. Looking forward to getting something similar to your set up. I’ll be deer hunting in about 7 weeks here in Missouri and I yearn to go on an Elk Hunt next year in Colorado OR Montana. Excited to try out the Athlon Optics products as I’ve heard great things about them and their affordability. Looking forward to your next article!
Hi Jason,
Thank you for the note! Best of luck on your hunt and keep me posted.
E
Thanks for a great article Erik. Great way to push training and practice.
Thank you Barnes Bullets for your support! My 2017 Indiana Deer hunt is coming up very soon, so we’ll be in touch.
E
Hi Jason,
Thank you for the note! Best of luck on your hunt and keep me posted.
E
Erik,
That was an excellent article. I like how you detailed out the thoughts that went into your build, and then shared how it worked in the field. Great pictures as well. I look forward to seeing your next post.
-Robert
Thx Robert! Please share with Stone Hart’s Management and staff.
E
Tyler from MK Machining here! Great post by Erik going through all the data that goes into stretching range out. Excited to see things reach further and further.
Good work Erik,
Tyler @ MKM
Thx for the post Tyler! MK Machining helped make it happen.
E
Thanks Eric for including a Bradley adjustable cheek rest in the build. Our products help shooters shoot better, farther. My cheek rests have been tested by every type of shooter out there. Putting this important piece of equipment in the build is often forgotten and sometimes never gets into the reason why a persons group is never consistent. We here at Bradley Cheek rest appreciate your usage of our product and would like to offer your readers a 10% off discount if this comment is read by them, please use “sniper22” at checkout under the coupon code section when ordering, thanks again for the mention and Happy Hunting!!
Thx for the post Brad! Your cheek rest really made a difference and I look forward to more hunting success stories in 2017.
Thank you for sharing the coupon code with the SHWAT readers. I’ll share the details with my FB and IG fans/followers.
E