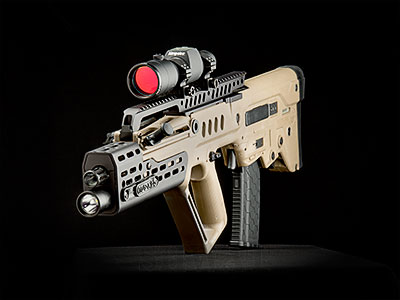
Nothing may be more American than customizing your rifle, even if the rifle you’re upgrading your favorite Israeli bred IWI Tavor. I’d seen pictures of customized Tavor SARs around the web but had no idea how easy it was to upgrade one until I got my hands on a pile of parts from Manticore Arms. As of this writing, just to see how far it could go I’ve never even cleaned my Tavor, much less disassembled it properly. I had no way to know how effortless it would be to customize. I’ve swapped my trigger pack out and that should have been a clue. Here’s a spoiler: swapping to the all metal Manticore Arms safety levers is simpler than upgrading an AR15 selector – by a lot. So I made a video. Watch and you’ll see a cool gun become even cooler, and you might just be surprised at how simple and quick these upgrades are to implement.
 Here’s a short synopsis of what I did and why, the video is at the bottom of this story.
I started with the Manticore Arms Tavor Curved Buttpad. I have to admit to seeing some humor in that label. In any event, it shortens the Tavor length of pull while keeping the overall length to a non-NFA 26 inches. So that’s a nice benefit. It also allows for a very nice contact surface for your pectoral or shoulder. It looks good, too!
Next up and an even simpler upgrade, the Manticore Arms LUMA Safety. This gives us a true ambidextrous safety which I like because it allows me to use my trigger finger to go from fire to safe. I know there are way cooler gun celebrities than I who have nice matched tool kits with proper punches to do this upgrade. I used a paper clip. Again, this is too easy not to do it. Wondering what LUMA means? Lever, Upgraded Metal Ambidextrous. Makes sense in the gun world, no?
The next piece of the Tavor upgrade puzzle would be a combination of the Manticore Arms ARClight XTL forend, their IPSM “Big Button” light switch and a Primary Arms Compact Weapon Light (rated for 700 Lumens for 70 hours!). I’ve mounted a light on my Tavor before, but having it integrated into an upgraded platform sure seemed like a good practical enhancement. In place of a proper workbench, I used an ARC Lok rail section to mount an Alamo Four Star Bipod to hold the Tavor. The forend can also be had in Keymod if you prefer. As you can see in the video there’s not much to combining these parts. Not only do you get the benefits of an integrated light, you get a unique look as well.
The last piece of this Tavor upgrade was to add the Manticore Arms Tavor Overwatch Full Length top rail. The purpose of this rail is to raise your sights higher. I didn’t ask Manticore about this, but from their website it appears their primary focus here was to allow commonly available iron sights to be at a height familiar to AR15 shooters. I decided to add an Aimpoint Hunter optic and this worked out very well. And the looks? See for yourself!
Taken individually or all together, these are great Tavor upgrades from Manticore Arms. Super simple to install and each offers its own benefits. The combined effect of the various upgrades delivers a super cool looking rifle, but more importantly it enhances the user interfaces and capabilities of the Tavor platform. Manticore Arms has other upgrades coming including a Tavor charging handle that I haven’t yet seen.
My Manticore Arms Tavor Upgrade Parts list:
Tavor Curved Buttpad $70
Tavor LUMA Safety $34.95
ARClight XTL Tavor Forend $175
Primary Arms Compact Weapon Light with Pressure Switch $84.95
Arclight XTL IPSM “Big Button” $24.95
ARClight ARC LOK aluminum rail segments $23
Tavor Overwatch Full Length top rail $135


